Page Layout
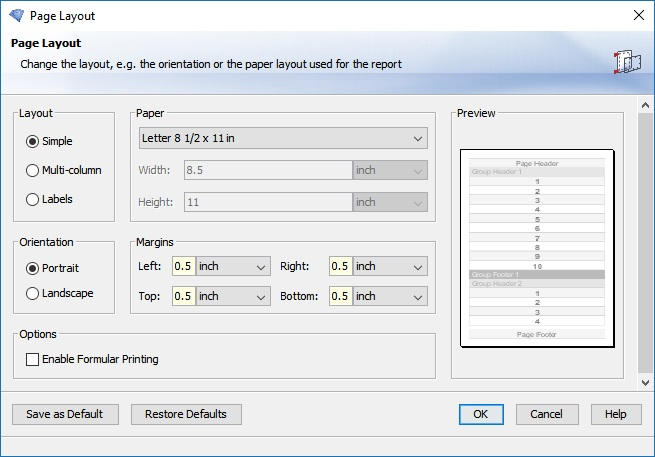
This dialog allows you to change the paper format and the page layout for the current report.
You can open this dialog with the menu item "Report | Page Layout..." or with the popup menu item "Page Layout" (rigth click on the page in the Design tab).

Layout
It is possible to choose between the layouts: Simple, Multi-column and Labels.
Simple
Your data are arranged in one column (from top to down).
One detail-block always uses the full page-width (less margins).
Multi-column
Your data are arranged in multiple columns.
In this layout you can set the width of the columns and the gaps between the columns in the columns-panel.
You can choose between "across then down" and "down then across" in the options panel.
Labels
Here your data is arranged the same way as in Multi-column-layout, but you can choose from some pre-defined labels.
If you use the User-Defined label then you can set the width, height, paper and gaps between detail-blocks of the report manually.
Paper
Specifies the paper format for your report. Use "User Defined" to set your own values for Width and Height. To print the user defined paper it is necessary that the used printer supports this paper size.
Note that if you have selected a pre-defined label you cannot set the paper as the label defines the paper-size.
Orientation
Here you can set the orientation (Portrait or Landscape) of the paper used for the report.
Note that if you have selected a pre-defined label you cannot set the paper-orientation as the label defines the orientation.
Margins
Here you can set the margins for the report.
Note that if you have selected a pre-defined label you cannot set the margins as the label defines the margins.
Columns
This section only appears in Multi-colum layout.
You can specify the width of a column, as well as the horizontal and vertical gaps between the cells.
Labels
This section only appears in Label layout.
Here you can choose one of the pre-defined labels to use for your report. To choose a label you have to select the manufacturer first. Afterwards the second combobox will offer labels from this manufacturer.
The selected label will set the paper, margins, orientation and dimensions for you.
When selecting user defined label you are able to set all settings manually.
Options
Enable Formula Printing
Enable this option if you like to print on forms. In this case the viewer will ignore the non-printable area of the printer and will not scale down the page if needed.
Dependent on your printer it can happen that content in the non-printable area will be lost.
Across then down
By default one column is filled with data from your report (from top to down) and then the next column will be started (down then across). If you set this option, one row is filled with data first (from left to right) and then the next row is started (across then down).
This option only applies to the layouts: Multi-column and Labels.
Format groups with multiple column
Specifies if additional to the detail section the group header and group footer sections will be printed in multiple columns. The header and footer will not cause a new page for a new group.
This option only applies to the layouts: Multi-column and Labels.
Suppress header/footer
If this option is set, all Report-, Page- and Group-header and -footer will be suppressed. This is very useful when printing labels, as the label-size is fixed and there is no special space for a header or footer.
When the dialog is closed with the OK-button and this option is set, all headers and footers in your report will be suppressed.
When the dialog is closed with the OK-button and this option is not set, all headers and footers in your report will be shown.
For the case that some header- or footer-sections are shown and other not, this checkbox offers a third state. With the third state, no headers or footers will be changed when the dialog is closed.
This option only applies to the layout: Labels.
Save as Default and Restore Defaults
In the bottom left corner you will find the buttons "Save as Default" and "Restore Defaults".
With the "Save as Default" button, you can save the current layout as the Default-Layout. That means each new report on this machine will get all the currently set pagelayout-settings (layout, paper, margins,...) on it's creation.
With "Restore Defaults" you can load previously saved Default-Settings for the current report (It does not restore any layout set after installation of the i-net Designer!).
Preview
On the right side a preview showing one page of the report is displayed. Here you can see whether made settings work as desired.
Note that the preview does not work with real data of your report. It only shows numbers as data and takes the settings from this dialog so you can see how the elements are arranged in order and how many columns would fit on one page.
