Inventory
The Inventory is a flexible application to create a catalog of virtually any kind of asset and connect that asset to users in the i-net HelpDesk, as well as the Tickets application. Assets are based up on a list of asset types that are pre-defined in the Configuration application, so they fit your needs. Information stored in the asset fields is also defined in the configuration, using asset fields.
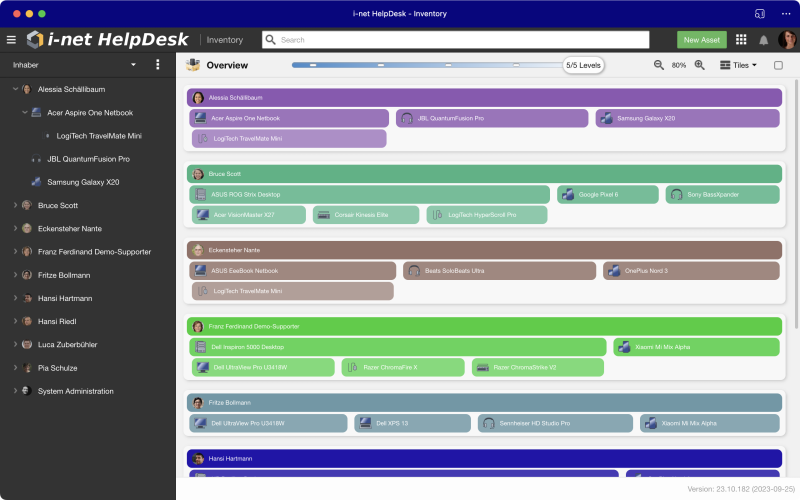
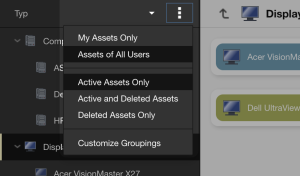
The Inventory interface is built so that you can quickly navigate even the largest list of assets. On the left side of the interface, there is an asset tree that can be structured freely. It also allows filtering assets by active, active and archived, or archived, as well as all assets or assets that belong to the current user only. The list can be filtered even further using the global search bar.
The main area has multiple display modes, accompanied by a toolbar. The toolbars most prominent features is a level slider to select, how deep down the asset groups are shown. In addition, you can zoom the view in and out1), change the display mode and select or unselect all items. As soon as one or more items are selected, additional functions become available.
When an individual asset is selected in the tree or the main view, the detail dialog opens. Therein you can update the asset information.

Asset Tree
The asset tree is the main navigation element. It can be grouped according to user-defined criteria and filtered depending on the permissions of the current user. Without grouping, assets are organized alphabetically by type. Nested sub-assets are displayed below their main assets. An asset can have multiple sub-assets at any time. There is no limit to the quantity assigned here. The selected grouping and criteria is also reflected in the main area.

In addition to the selected grouping, you can show:
-
My Assets Only - if your user has the permission to view all assets.
-
Assets of All Users - if your user has the permission to view all assets.
-
Active Assets Only - another level of visibility, including only assets that were not yet archived.
-
Active and Archived Assets - these are basically all assets.
-
Archived Assets Only - displays all archived assets.
Note: The options My Assets Only as well as Assets of All Users are only displayed if the user has access to all assets per permission. Otherwise, the user can view only his own assets.
Note: The sorting order is always alphabetical.
Customize Groupings
Asset Groups are customized in a dialog. They are available to all users of the inventory and cannot be localized. Groups can be created using any available asset field. They may also be nested as required.
Main Area
The main area of the Inventory can be displayed in three distinct ways: Tile view, List view and 3D view. As said before, the assets displayed in this area are also grouped by the selected asset grouping from the asset tree. The level of elements displayed can be changed using the level slider.


Selecting one or more elements updates the toolbar with additional actions:
-
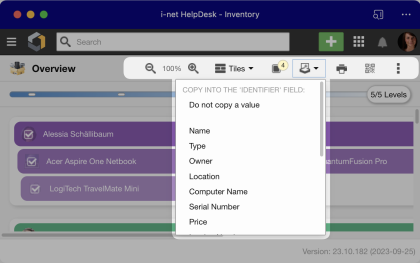
Create a new ticket: A new ticket will be created, referencing the selected assets. Additionally, you can choose an identifier, a field from the selected assets, that is set in the new ticket's identifier field. When creating a new ticket, all asset fields are taken over into the inquiry text. See Asset Actions for additional details.
-
Print selected assets: A report with every relevant information is created. You can create reports for one or more assets.
-
Print barcode/QR code for assets: A two-column report is printed that includes a QR code for each asset with the link into the Inventory. In addition, a barcode is printed for the asset number and for the serial number of the asset if the fields are filled.
-
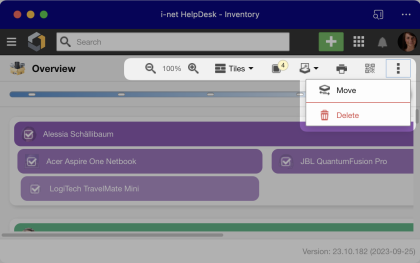
Move assets: This action can be accessed in the options menu. In a dialog you can select the new parent asset. It should be noted that all sub-assets will also be moved.
-
Archive assets: Moves this asset into the archived state. Assets may be unarchived later or can be removed from the database using the maintenance application.
Creating new Assets
Creating new assets can be done via the global button New Asset or New Sub-Asset. Depending on the selection in the asset tree - and thus the current level in the inventory - some asset fields are automatically filled with data. For fields that allow inheritance, you can alternatively enter your own value.
Tile View
The Tile view is the default view for the Inventory. It displays assets grouped as selected in the asset tree using colored panels. Five levels of asset children are displayed at most. If a level has too many elements, a hint is shown. By double-clicking on an element, you can navigate deeper into the structure at any time.
List View
The List view disregards the hierarchy of assets and their sub-assets, listing all assets of the selected node in a grouped or flat list. When displaying the flat list, every asset entry is put into the list, sorting the list primarily alphabetically by asset name, or by the selected column.
The grouped view is available only when a group is selected in the asset tree. The grouped list now displays the hierarchy of the selected group with as many levels, as set by the slider, with the actual asset at the bottom of each group. Sub-Assets are displayed in the same level as their main assets, sorted as selected by the column.
A column is displayed in the list for every asset field that is available in all displayed assets of the view. The smallest common intersection is used here. Columns cannot be reordered. However, you can resize the columns by dragging the divider. The first column Name is fixed and does not scroll away when scrolling side wards to inspect other columns.
Clicking on a column heading sorts the list according to the specified column. By clicking again you can switch from an upward to a downward sorting.
3D View
The 3D view is a third way to display the assets. There is a collection of asset fields that have a distinct skeuomorphic representation. Using one or more of these fields in a group, results in their representation being displayed in the 3D view. Again, up to five grouping levels can directly be displayed. Here are the representations in the order from the outermost to the innermost:
-
Field location: A location is a brick and mortar building. Buildings are separated by streets. You can use that to display for distinct factory or company locations.
-
Field room: A room with its own inner walls, a door and the room number or room label.
-
Field user: A user who is assigned to an asset is represented by a table. The table has a picture of the assigned user as well as the user's name tag on the table.
-
Field type: Field types are represented by a PDA device.
-
Field license: Licenses are displayed as a sheet of paper.
-
Field invoicenumber: An invoice is displayed as a sheet of paper.
-
Field sla: An SLA is displayed as a sheet of paper.
-
All other fields are represented by a colored box.
Note: The above fields are described by their key here. You can customize the labels of these fields as required - but since these fields cannot be removed, the keys are always available.
Asset Details
The Asset Details view is opened when selecting a single asset. The details view allows inspecting and modifying the asset, including all asset fields defined for the asset type. When selecting an asset, the asset tree is opened accordingly and also selects the current asset. For an asset, there are multiple tabs available:
-
Details: In the Details tab you can inspect all asset fields associated with this asset type. In addition, you can assign an image to the asset and update the parent asset.
-
Attachments: Using attachments you can add, e.g. manuals to an asset.
-
Owner: In the Owner tab you can assign the asset owner and inspect their user data. A user is only allowed to inspect the owner data of user fields when permission is given to them by the configuration of the user fields.
-
License: If the asset type supports licenses, this tab will be available. Here you can change the connected license and inspect the licenses' information.
-
Service Level Agreements: If the asset type supports sla, this tab will be available. Here you can change the connected SLA and inspect its information.
-
Vendor: If the asset type supports the vendor, this tab will be available. Here you can change the connected vendor and inspect its information.
-
Changes: All changes of an asset are logged and displayed in this tab. You can inspect who modified the selected asset.
Field Inheritance
Values for asset fields can be inherited from the owner, or from a parent asset if no owner is set. The following fields allow inheritance:
-
Owner, Room, Location, Cost Center
The respective field keys are:
-
owner,room,location,costcenter
Field inheritance enables you to automatically update these field values when moving an asset to a new owner or assigning a different parent asset.
Note: Asset fields are always primarily inherited from the owner, even if the owner itself was only inherited from the parent asset.
Asset Actions
Assets have a number of actions that can be performed. The actions are available from the options menu on each asset, as well as in the details dialog.
The actions Move, Duplicate, Print and Archive should be self-explanatory.
New Ticket
Creating a new Ticket from one or more selected assets allows creating references between them. Supporters have quick access to affected assets when working on the ticket. A newly created ticket receives the content of all fields set in the selected assets and prefills the inquiry field.
Additionally, you can assign an identifier, that is an asset field that you want to be filled into the ticket's identifier field. When clicking the New Ticket entry from the options menu, you are presented with the asset fields of the asset that was selected first. However, if you have multiple assets selected and choose an identifier field that is not set in the asset you selected first, then the identifier will be filled using the field value from another asset. In that situation, the order in which the assets were chosen is kept. The first field value that is not empty will be used.
Tickets of the Asset
The Tickets of the Asset menu entry is a link into the Ticket application with a search prefilled with the asset. It will then display a list of tickets that have the selected asset referenced.
Using this option, you will quickly have an overview of all tickets that had an issue with your selected asset.
