Users and Groups
The Users and Groups application is essential for configuring user permissions and personal settings. Access to the Users and Groups Manager requires at least the Administration / Create users and manage general data permission. Only then will a user be able to browse and view all users, create new users and change general information about these users.
The additional Administrate users and groups permission allows users to create and edit groups, activate/deactivate and delete users and groups, and change their memberships and permissions.
The Users and Groups Manager interface consists of two main areas:
-
the detail area
In addition to these areas, there is a search bar and an action button for creating new users or groups. Creating new users and groups is always possible from the Users and Groups application, although it may be disabled for other areas of i-net HelpDesk by the login configuration setting.
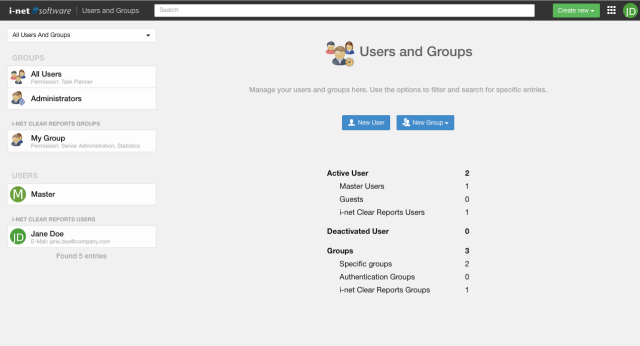
Users and Groups List
The list will contain up to 5000 users or groups - depending on the selection and filters used. You can switch the scope with the upper selection to filter for:
-
All users and groups
-
Specific Users - eg. Master User, Guests, i-net HelpDesk Users, Deactivated Users
-
Specific groups - eg. Administrator Groups, i-net HelpDesk Groups, Authentication Groups
The list below the selection will then be filtered accordingly in a strictly alphabetic order of the display names. It is grouped by the different group- and user types.
Plugins, such as System Authentication and Product Authentication provide i-net HelpDesk Users which are a common type of users in the system. Authentication plugins can also provide Authentication Groups which are a special type. They can be created using the Create New button, but they can not have users assigned directly. Authentication Groups have their user assigned in the respective plugins login mechanism.
Note: Only group names known through users who are already authenticated can automatically be suggested when creating a new Authentication Group. As of yet unknown groups can be added and configured as well.
Predefined users and groups
The following predefined users and groups are available:
-
Group: All Users
-
Group: Administrators
-
User: Master
The Master user will be created when the master login is used for the first time. This user always has all permissions and can not be deleted or modified. See Master Password for additional information.
The Administrators group is always available and also has all permissions. Users can be assigned to this group to grant them full access permissions to the i-net HelpDesk server.
The All Users group enables you to set default permissions for every single user in the system.
Search
If there are too many entries in the users and groups list to find a specific one, it may need to be filtered down. Additional filters can be entered using the search bar. This allows you to search for users and groups using specific properties, e.g. First Name, Last Name ...
See Global Search Bar for additional information.
User and Group Details
When no user or group is selected, statistics will be displayed in the detail area. There are buttons to create new users and groups.
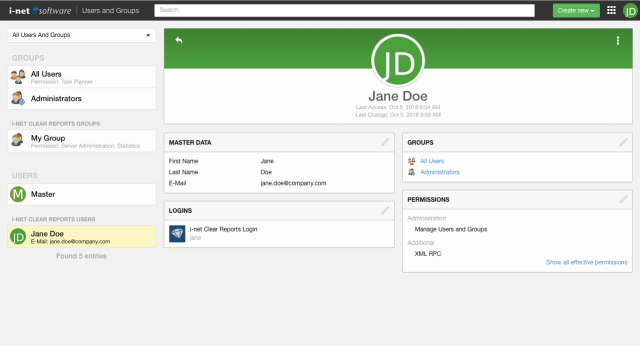
When a user or group is selected in the list, detail information is displayed. The header area contains information specific to the selected subject. Quick actions are available through the upper right menu in the header area. For users these are: Set Blocking Notice, Deactivate, Delete and Show stored user data. The users avatar can be changed by clicking on it. (Some of the actions mentioned before are only available with administrative permission)
The content area also contains information specific to the selected item. It consists of grouped information elements that can usually be edited. Additional plugins can extend this information.
Note: Deleting users is only possible here if allowed in configuration, otherwise the menu item is not available. To delete users permanently from i-net HelpDesk in that case the user accounts module in the Maintenance application must be used.
User details
The users details section contains the following information:
-
Master Data contains the first name, last name and email address of the user
-
Logins contains a list of logins the user has assigned to the account
-
Groups contains a list of groups assigned to the account (administrative permission required)
-
Permissions contains a list of assigned permissions. Permissions have to be enabled to show this section. (administrative permission required)
Set/Edit/Remove Blocking Notice
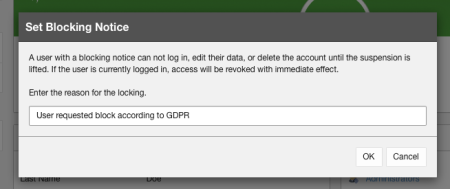
According to privacy regulations, it is possible to block a user from being deletable and editable. A user's blocking notice can be set, edited or removed from the option menu on the upper right of the user detail area. A user who has a blocking notice set will be treated as deactivated. That means that the user can only be deleted permanently after the blocking notice is removed.
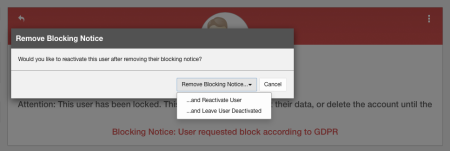
Removing the blocking notice additionally gives the options to reactivate the user. Otherwise the user will be in a deactivated state.
Stored User Data
The menu option to Show stored user data generates an overview of all the data stored for the selected user. Individual users can request their own data takeout from the account tab.
This way a user can know how much and which data i-net HelpDesk collected.
Note: there may be some internal information that is not displayed in the stored user data page. This information is part of the Event Log for the Administrator of the server.
Group details
The group details section contains the following information:
-
General contains the groups name
-
Memberships contains the users assigned as members to the group (administrative permission required)
-
Permissions contains a list of assigned permissions. Permissions have to be enabled to show this section. (administrative permission required)
Editing User and Group Details
Editing details of a user or group can be done in a dialog which opens after clicking the edit button on the grouped element in the content area.
The edit dialog consists of multiple tabs, one per grouped element.
Most settings are self-explanatory. For more information about complex settings, please check the links from the User details section.
Details of Users and Groups
User details
Set client settings as default
Each supporter can customize the layout in the Tickets application. Layout includes showing or hiding:
-
Buttons in the toolbar
-
Columns in the overview
-
Ticket fields in the detail view
This menu item is used to set the changes to a user's layout as the default for all users. If a user later makes changes, e.g. to the layout of the ticket overview, these take precedence over the settings set as the default. Layout settings that the user does not change are still adopted from the default.
There are two options in this dialogue:
-
Set as default for unset and new users: If a user has already made their own layout changes, these will not be overwritten. The default settings only apply to new users and to fields to which the user has not yet made any changes.
-
Set as default and reset all users: The existing layout settings of all users are reset and the new default settings now apply.
Edit my Data
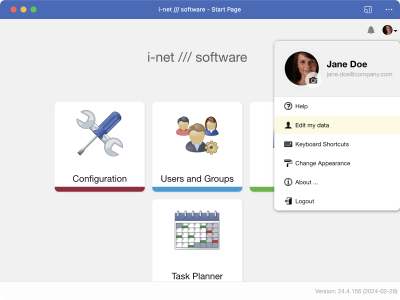
You can edit your personal information in a dialog, which can be opened from the main system bar. In addition, there are menu entries, e.g. to customize the user theme. The following information areas are available in the user data dialog:
- User Logins
- Master Data
- Sessions
- User Group Memberships
- Permissions
- Account
- Resources
- Flat rates
- Accounting of costs
- Allowed Ticket Actions
- Server Printers
- SCIM
- Token Authentication
Avatar
Another function is the option to update your avatar image. Using the additional Avatar plugin you can also select an avatar service to fetch your user image from, when an email address is set in your account.
![]()
